How to Install a Kitchen Sink Drain Pipe | A Few Simple Steps
The kitchen sink is our regular necessary thing in our home decor. We need to clean or change it every year. But sometimes it becomes so time-consuming to install it properly. Again, if you have enough idea about installing a kitchen sink drain pipe, it would also save your money.
We often haven’t enough time to hire a plumber to set it or clean it in our busy lives. It would better to clean or install a kitchen sink by yourself. Please don’t take it otherwise; give these above ideas to get your work quickly. Stick to the leading methods of how to install a kitchen sink drain pipe | a few simple steps to grasp knowledge.
A simple step by step advice for installing a kitchen sink drain pipe:
“How to install a kitchen sink drain pipe | A few simple steps” is the solution for your tension. Then move on to the following three simple methods that are easy to do. So let us get started.
Method-1: Connect your kitchen sink drain pipe with a different venting method
Before doing the job, change all the old accessories and gather some necessary tools. Venting methods are proper guidance to connect a kitchen sink drain pipe. Stick to the following steps to do this method with accuracy.
Steps-1: Gather all the accessories to connect your kitchen sink pipe
Before starting the job, gather all the accessories to connect your kitchen sink pipe. It would help if you had these below accessories.
1. Lenox Plastic Hand Saw.
2. Red Tubing Cutter.
3. ½” inch Chrome Escutcheon.
4. 2″ inch Chrome Escutcheon.
Steps-2: Unscrew All The Old Accessories
First of all, unscrew all the old accessories. Place a bucket under the supply line, then unscrew the supply line. I recommend spreading an old counterpane on the floor. Open the two fittings below the sink.
Cut the bottom pipe attached to the sink with a fresco blade. Keep the old fittings on the counterpane and clean the outer part of the sink with a tissue.
If you want, you can move your old sink style into a new one.
Step-3: Lock the two strainers with a rubber band
Lock the new strainer with a rubber band and center it on the base of the drainage. Under the sink locked it down with a plastic cup. And secure it with a locker. However, tightening the locker with a plus. Use a long steel tube on the base of the sink.
Do not over-tightened it unless it will break the plastic container after the base of the sink. Put circle shape plastic bands under these tube bases. Put it up to 1 to ½ inches. Remember these two base container doesn’t exceed this measurement.
Steps-4: Cut out the PVC pipe with a plastic hand saw
Cut out the PVC pipe with a plastic hand saw. A plastic hand saw is an optional tool like the tubing cutter. Use one of these cutters to get a perfect cut. It will ensure you a straight cut. Again, cut the tube in the middle. Use some crack cement and join the head with the center of the pipe.
Using Crack cement is essential to joint the head of the PVS tube. Apply a thin layer of Crack cement for joining any Connector of the tubing. It will ensure your fittings security. After applying the cement, push them lightly to making a strong bonding.
You can hold the tubing connector together for 2-3 seconds. Let them dry and remove the excess cement from them.
Steps-5: Connect the PVC drainage pipe under the sink
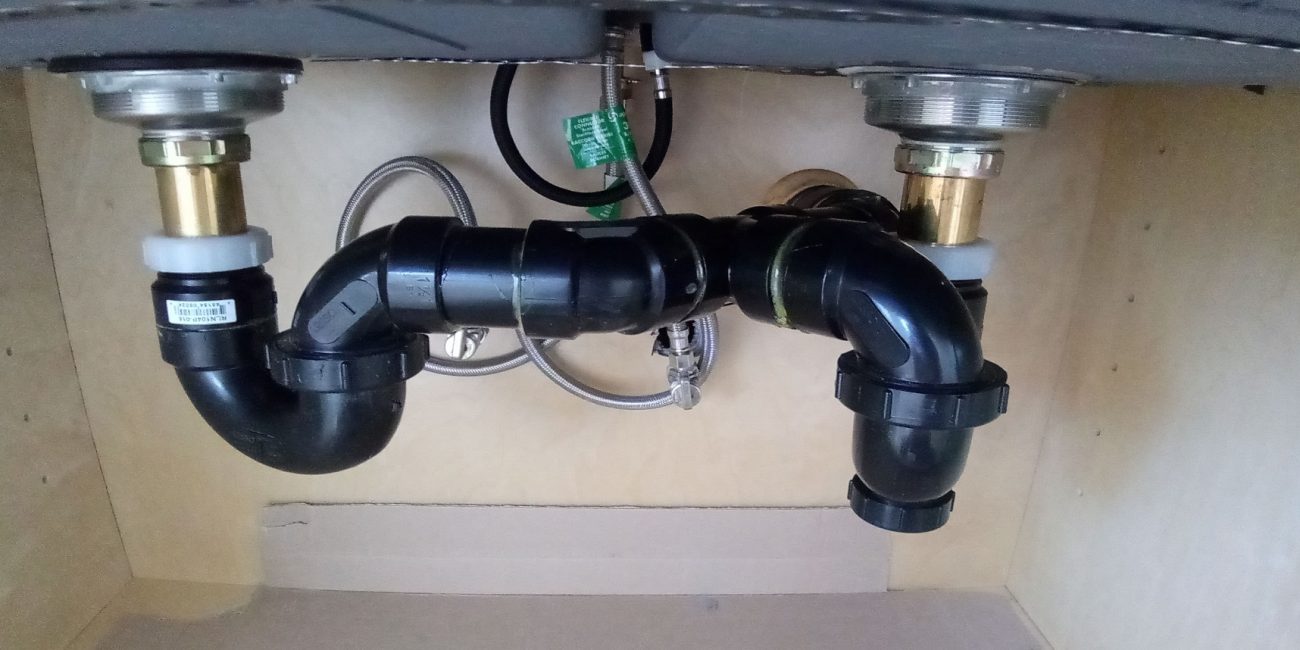
In this case, connect the first drainage pipe under the left sink to a 90-degree angle. Connect them with the black locker. Then connect the second drainage pipe in a “T” shape. Connect it under the right sink. But keep the same height while clicking them.
Steps-6: Connect the dishwasher pipe
At this time, connect the dishwasher pipe at the “T” shape and a 90-degree angle. Before joining, measure the distance between the “T” shape and a 90-degree angle.
Steps-7: Connect the drainage pipe under the sink
On this final task, connect the drainage pipe under the sink. Connect it with the right side strainer. Keep the tube in a “U” shape and measure the distance between the sink’s final drainage. Finally, Connect the drainage pipe with the supply line.
Always try to keep your tailpiece clean and junk-free. Secure it with a glued joint. Check the verdict of the sink by flowing some water on the sink.
Method-2: Install The Sink Drainage Pipe with a DIY Systems:
Suppose you’re still searching for learning the installation process of your sink drainage pipe.Follow these eight simple DIY steps for doing your work efficiently and comfortably.
Step-1: Collect the things we need to do in this method
We usually need these things to do this method. These are giving below.
1. Tubing shape cutter,
2. Jigsaw,
3. Drill or a driver,
4. Screwdriver,
5. Machine Piller,
6. Adjustable wrench,
7. Tap measure, hacksaw,
8. Utility knife,
9. Straight edge,
10. Spade bit.
Step-2: Measure the kitchen sink’s surfaces and mark it
First of all, mark the sink’s back edge in the middle. If your sink has a template to look at, you will draw align. Make sure about 1 to ½ inches distance from the counter. Keep it parallel.
If your sink has no template, you can use 2-inches tape. It will ensure you’re sinks outline. Always try to mark the center backups of the sink. Now measure the length & width of the sink-lips.
Step-3: Mark the sinks cut lines
After finishing the measurement, make a big rectangular mark on the sink’s counter. To find out the radius of the sink’s corners, make a big circle with your hand.
Then use a spade bit that slightly more significant than a jigsaw blade. Usually, the range is up to 1 and ½ inches. Then cut a big hole inside the radius with a drill.
Step-4: Cut Your Sink’s Mouth with a jigsaw
Cut out your sink mouth with a sharper jigsaw. Lay a few inches longer wood scrap and cut across the sink area. Then cut out the front and back lines. However, remove the remaining cut out pieces from the wood. Check out the fit of the sink. Trim the sink’s hole with the jigsaw, if compulsory.
Step-5: Install the kitchen faucet inside the sink:
Install the kitchen faucet inside the sink deck. Attach the faucet’s supply tubing, tailpiece inside the gasket. It will seal the spout to the sink. Then screw the mounting nuts. Make sure that the tap can swing in a full arc under the sink’s deck.
Step-6: Apply a Plumber’s Putty over The Strainer
Apply a thin layer of plumbers putty over the strainer’s lip. Now push the putty towards the sink’s drain hole, then skid the washer, gasket, and housing. However, add a pipe-joint compound to its extra threads.
Press the thread on your middle finger. And give tightened the locknut onto the strainer with the pillar. Tighten the nut carefully while holding the strainer on your hand.
Step-7: Set out all the accessories
It is the final step of this method. You have to set out the sink and connect the PVC pipe under the countertop or the sink. If you still notice that your strainer won’t set out the countertop hole, you can use some silicone caulk.
Join the sprayer hose to the faucet’s threaded tailpiece. Then cut the PVC pipe for connecting the trap adaptor. Dry out the feet length of PVC. Cut the pipe with a utility knife and coat the line with a PVC primer. Now join them together.
Push them immediately and hold them for 25-30 seconds. Then set out all the threaded connections. After that, this is time to set out the dishwasher drain. For that, take a dishwasher drain line. And set out the waste nib to the tailpiece. Then take a screwdriver and tighten the hose clamp.
However, remove the aerator from the sink’s faucet. Then check out its density by running the water. Look carefully and find any leakage along the supply and drain lines. If there any, tighten the nuts approximately.
Conclusion:
The cost of setting up a kitchen sink drain pipe varies on your demands. If you hire an expert, the price will vary from $50-$300 based on your sink. Sometimes it depends on the sizes and types of the sinks. It isn’t easy to set out a kitchen sink for connecting the new sink and faucet. The kitchen tailpiece and the waste line may give you a headache about which side to start.
It is better to stars from the tailpiece. Then go beyond the waste line. It would be a wise decision to buy a bare tool despite getting an installing kit. Now you can do this installation task by stick to “how to install a kitchen sink drain pipe | a few simple steps.”


Comments(0)