How to Spray Paint Furniture with a Spray Gun | Follow 10 Easiest Steps

How to Spray Paint Furniture with a Spray Gun | Follow 10 Easiest Steps

Painting your old furniture is becoming fun nowadays. It is high time that we used to paint old furniture with messy brushes and rollers. Unlike these, they are time-consuming and costly. Your family budget becomes shorter if you have to seek help from professionals. Using a spray gun might be your first choice while you’re looking for the cheapest way to paint your furniture. 

It is the only way to transform your old table, bed, or dresser into a new look. You’re surprised to see its super durability and magnifying finish look compared to the old ones. But you’re not alone who doesn’t have any experience and ideas on how to spray paint furniture with a spray gun. So learn out below to get some ideas and strategic ways about it. 

Analytical Discussions on How to Spray Paint Furniture with a Spray Gun:

I have discussed here only seven steps that help you to do this task more comfortably. Most often, you may feel anxious whether you’re doing it righteously or not. A spray gun is one kind of nano-technological machine that is used to spray a liquid such as pesticide or paint. It works under pressure. So let us have preparation on how to spray paint furniture with a spray gun.

    The Things you’ll need: 

    • Protective eyeglasses.
    • Respirator, 
    • Spray paint gun, 
    • Color primer, 
    • Color paints,
    • Paint strainer or container, 
    • Water,
    • Sanding block, 
    • 120-200, and 800-grit sandpaper,
    • Air-compressors, 
    • Old t-shirt or clothes.

    Spray Paint Furniture with a Spray Gun

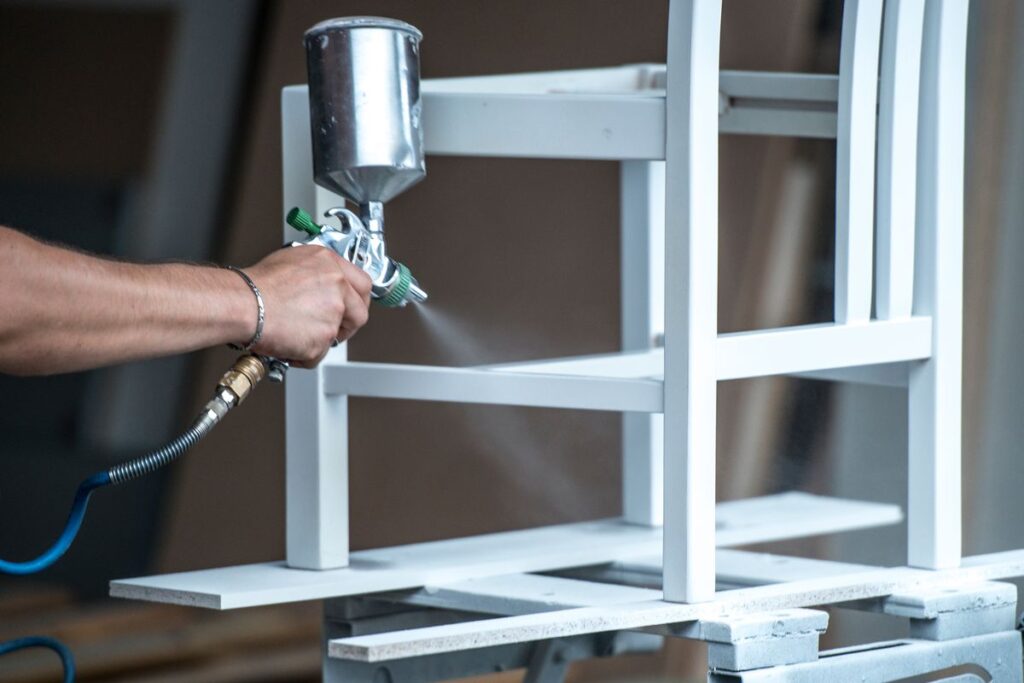
    How to spray paint furniture with a spray gun?

    Study the following steps to learn how to use a spray gun to spray paint furniture.

    Step-1: Prepare Yourself for The Task

    Before painting your furniture, wear a pair of safety glasses and hand gloves on your hand. Wear a safety mask on your nose. Musk will protect you from the nasty smells of the paints. And safety glasses or goggles give protection to your eyes from dust. Don’t have any respiratory musk or safety glasses? 

    You can wear an old cloth on your nose and old glasses on your eyes. These old products at least give you minimum protection from debris and dust. Wear an old plastic wrapping bag on both your hands. And bind them with elastic rubber. 

    Step-2: Set out a Drop Cloth Indulged Area for Painting 

    Work somewhere like an open veranda, garage, or your house lawn, a driveway, and a long yard. Ensure that the area you choose must be well-ventilated and wide-enough. Put an old cloth or a plastic drop sheet in the yard. It will protect the lawn or surface from paints. Now, noted these four things before starting your main work- 

    • If you’re working outside, ensure that the weather is dry and there is not enough wind.
    • If you’re working inside your home, cover the nearby items with plastic cover sheets or old cloth to avoid accidents.
    • Make a hang drop clothes up to create a makeshift paint barrier as an alternative. 
    • People used to cover the other furniture with old clothes to protect it from unwanted painting sparks. 
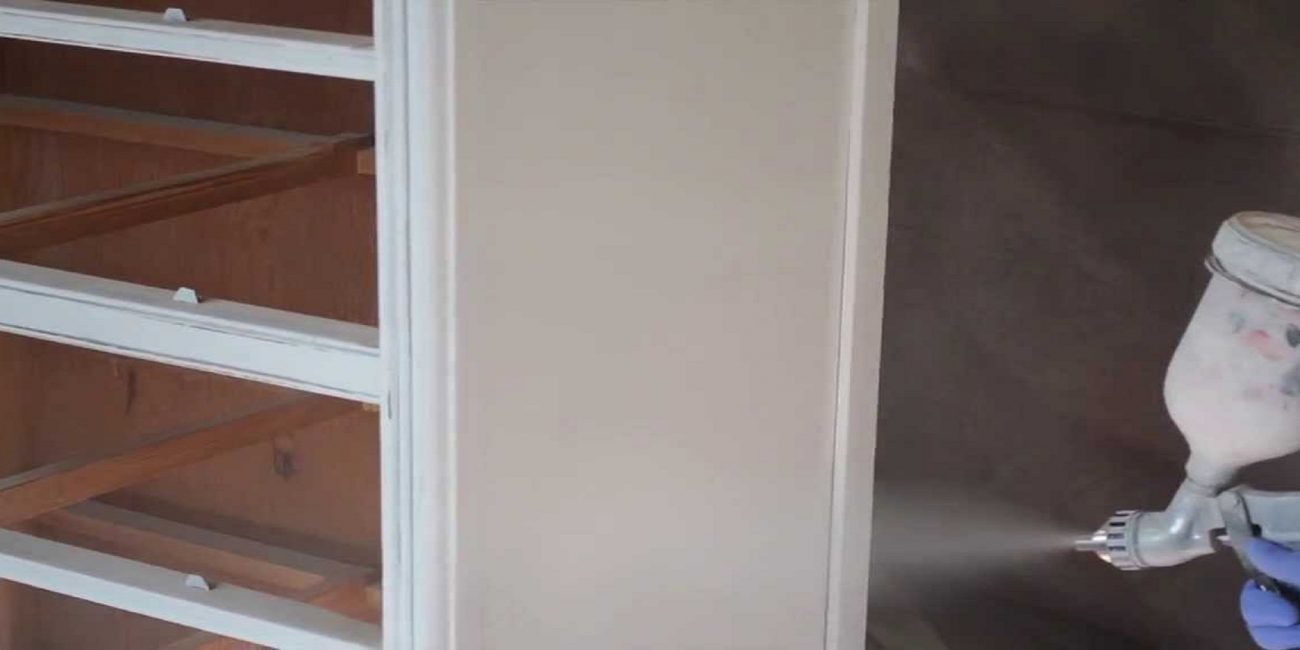
    Step-3: Unscrew All the Hardware from the Furniture to spray paint with a spray gun

    On these third steps, bring all the furniture that you wanted to paint. Then unscrew all the hardware such as handles, knobs, hinges, screws, etc., from this furniture. If you want to paint the sofa, you won’t forget to remove the covers and foaming materials. Keep the little hardware in a safe filter. Use a plastic jar or a container to collect them once in a while. 

    You’re painting is now furnishings and smooth by removing all these small accessories from the furniture. It’s just the way that makes your work more comfortable and professional. Now get on to the next steps. 

    Step-4: Sand Your Wooden Furniture with a Sand Paper

    Most of the family are having wooden furniture in their residences. It is crucial to sand your wooden furniture with sandpaper to remove the harshness. Some wooden furniture may be damaged or decay affected by wooden insects. To skip these issues, you can place sandpaper operating the sanding block. Move it to and fro over all the furniture’s surfaces. I am finally going through the grain of the wood due to rough it up. Repeat this process with finer-grit sandpaper for smooth wooden tools such as 220-grit sandpaper. 

    Step-5: Use a Wire Big Brush for Smoother Your Metal Furniture 

    To smooth your metal furniture, such as a center table, tea-table, corner table, or a cot, you have to use a wire brush. The brush removes flaking paint, bits of rust, and other junks from the metal pieces roughly. Then, take 220-grit sandpaper to use on the sanding block. You can use any sandpaper to brush out the metals. Rub the sandpaper too well all over the metal furniture. Please do not rub it too fast; it’s better to use circular motions to get the best results. 

    Step-6: Remove All the Sanding Dust with a Old Cloth and Vacuum It

    Now, wipe every piece of furniture down thoroughly with an old cloth. An old cloth will help to remove dust from the sanding. Consider ending up finding its way into your paint while you find any sanding dust. 

    Again, if your furniture is of metal or brass, you should dampen the old cloth or a microfibre cloth to clean the furniture’s surface area after sanding. Let the painted furniture dry for a minimum of 4-5 minutes before proceeding to the next steps. 

    Step-7: Add a stain-block Primer before Starting the Paints

    A Kitchen Sink in a New Countertop

    You’re in a dilemma: what’s the necessity to add a stain-block primer on painting? If yes, a stain-blocker will make a barrier between the wood and the paint. It removes tannins from the wooden furniture. Keep in mind, before choosing any primer inquiry fact, what kind of paints you’re going to use? The carpenter uses oil base primer for oil-based color and a water-based primer for water-based paint. 

    If you avoid these steps, tannins will bleed through the paint to reason for discoloration on the paint’s surfaces. It is better to pick water-based latex paint for wood furniture and alkyl-based oil paint that makes your furniture light and heavy on the color variations. Choose oil paint for outdoor or indoor furniture that gets used all the time. 

    Pick water paint for the furniture that doesn’t get used regularly. Ensure that you’re prime and color are of similar types.


    Step-8: Pour Your Paint in Strainer and Make Ready Your Spray Gun

    Before starting the paint, 

    • pour your paint into a strainer, 
    • Then thin your paint by adding 5-15% water for both watery and oil-based paints,
    • Then make ready your spray gun,
    • Connect it with an air compressor,
    • Before connecting, screw the air hose onto the hole in the handle of the spray gun,
    • Please turn it on at the PSI specified by the spray gun’s manufacturer, 
    • Wait until the pressure built up to the correct PSI range. 

    Pour the primer on the paint cup and screw this onto the spray gun, lock-off the cup tightly into place. Then hold the paint gun about 12″ inches or 20-30 c.m away from the furniture. Press the trigger of the spray gun, round the nozzle of the gun all over the furniture. 

    Now, shield the whole piece of furniture in a primer with an overlapping process. Do this process frequently for every piece of furniture in your home.

    Step-9: Let the Primer Dry and Sand It lightly Again

    After painting your furniture, let them dry for at least 30 minutes or 1 hour for the primer. Put 800-grit sandpaper on a block. Sand it lightly and smooth out the bumps of the primer. Wipe off the debris with an old cloth.

    Step-10: Re-apply the primer on the same process & Finish the task

    In these final steps, re-apply the primer on the same process. Fill your paint cup about 2-3. Then dry out the furniture for 4-8 hours. Sand it again with 800-grit sandpaper. They were going through the grain of the wood and finding out if any imperfections notice. Smooth it out and wipe off the dust with the same cloth. 

    Apply the second coat of paint by the paint sprayer. Use a coat of polyacrylic sealer for which you get used heavily. Re-attach all the hardware of your furniture and clean the place where you work. 

    Conclusion 

    If you don’t have any spray guns, you can hire or buy them in a home improvement center or hardware shop. Now the task becomes so easy for you. Make sure that the paint you choose belongs to sound quality. Ensure the perfect paints for your wood or metal-based furniture. Every time hold the spray gun on the bottom of your finger and press the trigger with as much pressure as you need to spray it out. Paint the furniture in a circular motion and move it through the motion of the sprayer. 

    Pick the best quality full primer and paint because it will flourish the brightness of your furniture. Now, let’s do a painting by following the instructions of how to spray paint furniture with a spray gun. Happy painting for a while! 

    Share:

    Comments(0)

    Write a comment